Building Blocks of Distributed Systems
October 8, 2018 · Filed in ArchitectureThis blog post is based a chapter from The Architecture of Open Source Applications titled “Scalable Web Architecture and Distributed Systems.”
The Architecture of Open Source Applications

Before getting into the details of the chapter, the book itself deserves some introduction. Its opening pages make the compelling point that architects in the traditional sense are exposed to and study thousands of real buildings, but software architects rarely make a similar investment, leading to repeated mistakes:
Architects look at thousands of buildings during their training, and study critiques of those buildings written by masters. In contrast, most software developers only ever get to know a handful of large programs well—usually programs they wrote themselves—and never study the great programs of history. As a result, they repeat one another’s mistakes rather than building on one another’s successes.1
Each chapter is written by experienced software developers who impart knowledge of a particular system or design. Some other chapters include nginx, Firefox Release Engineering, and Git. The chapter covered in this post primarily uses an image hosting application to explain the principles and building blocks of scalable distributed systems.
Building blocks
After explaining the general principles, the author asserts that the most challenging aspect of building web distributed systems is scaling access to the data. While application servers are designed to be stateless and embody a shared-nothing architecture, “the heavy lifting is pushed down the stack to the database server and supporting services.” The data access layer is “where the real scaling and performance challenges come into play.”2
Caches, proxies, indexes, load balancers, and queues are the building blocks of a scalable data access layer. Rather than covering the entire chapter, I will focus the remainder of this post on these building blocks.
Caches
Caches are ubiquitous in computing. Their ability to scale read access in a system is clear. They “take advantage of the locality of reference principle: recently requested data is likely to be requested again.”2
In a previous blog post, I wrote at length about the importance of having multiple layers of caching, including client-side caching. The author of this chapter reached a similar conclusion:
Caches can exist at all levels in architecture, but are often found at the level nearest to the front end, where they are implemented to return data quickly without taxing downstream levels.2
When clients avoid “taxing downstream levels”, they enable more growth in the system without the need to scale out. For example, assuming linear scaling and equally taxing requests, if clients implement caching that reduces their usage of the backend by 50%, then the backend can handle twice as many clients without purchasing more resources.
The chapter’s coverage of caching augments my previous post with a helpful discussion of cache placement.
Cache placement
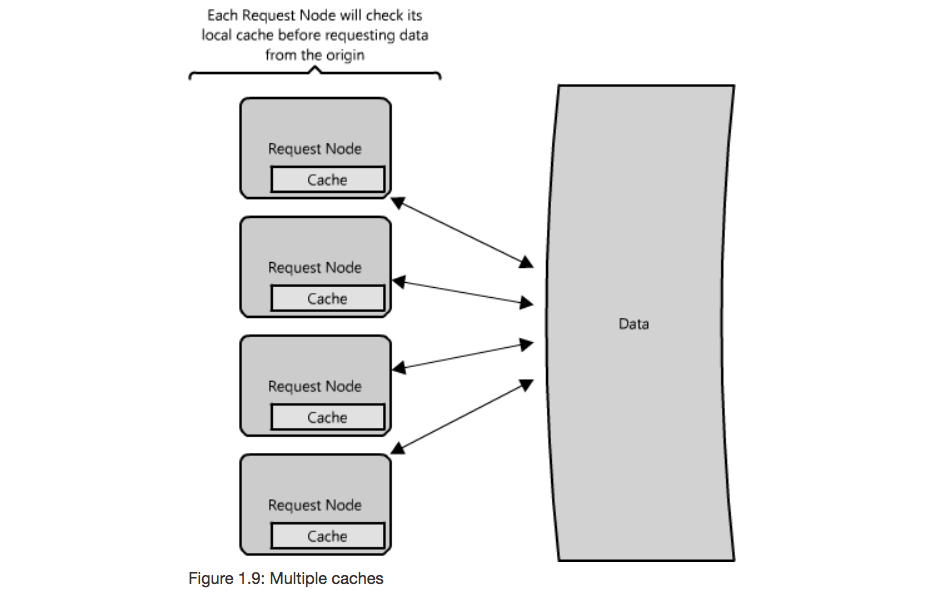
- Request Node: collocate the cache with the node that requests the data
- Pros
- Each time a request is made, the node can quickly return cached data if it exists, avoiding any network hops
- Often in-memory and very fast
- Cons
- When you have multiple request nodes that are load balanced, you may have to cache the same item on all the nodes
- Pros
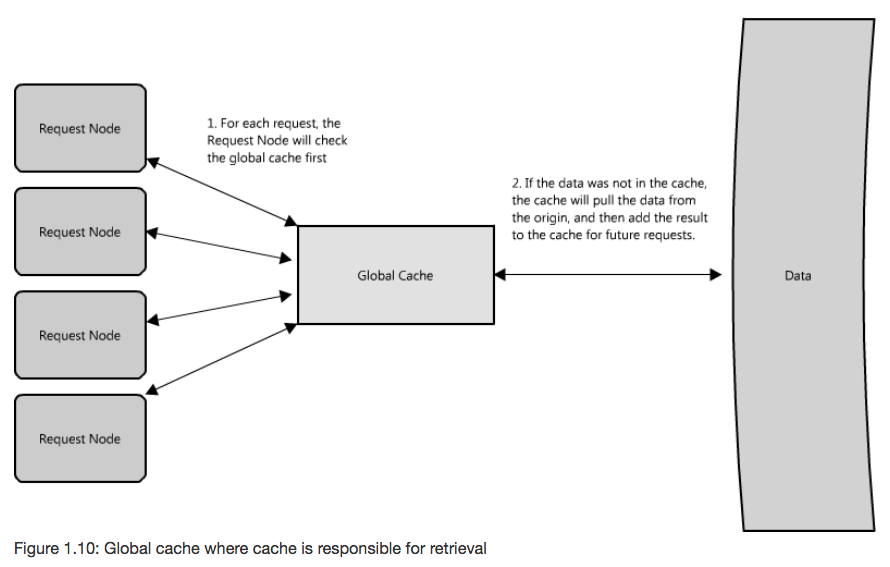
- Global Cache: central cache used by all request nodes
- Pros
- A given item will only be cached only once
- Multiple requests for an item can be collapsed into one request to the backend
- Cons
- Easy to overwhelm a single cache as the number of clients and requests increase
- Types
- Reverse proxy cache: cache is responsible for retrieval on cache miss (more common, handles its own eviction)
- Cache as a service: request nodes are responsible for retrieval on cache miss (typically used when the request nodes understand the eviction strategy or hot spots better than the cache)
- Pros
- Distributed Cache: each of the nodes that make up the cache own part of the cached data; divided using a consistent hashing function
- Pros
- Cache space and load capacity can be increased by scaling out (increasing the number of nodes)
- Cons
- Node failure must be handled or intentionally ignored
- Pros
Proxies
At a basic level, a proxy server is an intermediate piece of hardware/software that receives requests from clients and relays them to the backend origin servers. Typically, proxies are used to filter requests, log requests, or sometimes transform requests (by adding/removing headers, encrypting/decrypting, or compression).2
Proxies are a deceptively simple building block in an architecture: their very nature is to be lightweight, nearly invisible components yet they can provide incredible value to a system by reducing load on the backend servers, providing a convenient location for caching layers, and funneling traffic appropriately.
Collapsed forwarding
Collapsed forwarding is an example of a technique that proxies can employ to decrease load on a downstream server. In this technique, similar requests are collapsed into a single request that is made to the downstream server; the result of this request is then written to all similar requests, thus reducing the number of requests made.
A simple example of collapsed forwarding is deduplication. If a resource X is requested 100 times, the proxy can make a single request to retrieve X from the downstream server and then write the same response body to the other 99 requests for X.
This is particularly helpful for the downstream server when resource X is large in size. Let’s assume a 5 MB payload that must be read into memory (rather than streamed). Without deduplication, the hundred requests would require the server to wastefully read 5 * 99 = 495 MB into memory. The deduplication step in the proxy can smooth over spikes and reduce the memory usage dramatically.
Let’s implement a simple proxy and server in Go with collapsed forwarding!
Our implementation of collapsed forwarding will batch together requests for the same URL. Every five seconds, our requestBatcher will flush its batches of requests by handling one request from each batch and giving the same result to the rest of the requests in that batch.
type requestBatcher struct {
    batch   map[string][]*request
    handler http.HandlerFunc

    mu    *sync.Mutex
    close chan struct{}
}

type request struct {
    w    http.ResponseWriter
    r    *http.Request
    done chan struct{}
}
requestBatcher will store the batches of requests as a map from string (URL) to a slice of requests. The handler will indicate how the requests should be handled. We’ll protect our map with a mutex mu and have a close channel for a clean shutdown.
A request is everything we need to process the request, the original request r and the writer w for writing the response. We’ll also have a done channel that will allow the flush step to tell the goroutine handling the request that the request has been handled.
func newRequestBatcher(handler http.HandlerFunc) *requestBatcher {
    rc := &requestBatcher{
        batch:   make(map[string][]*request),
        handler: handler,
        mu:      &sync.Mutex{},
        close:   make(chan struct{}),
    }

    go func() {
        for {
            ticker := time.NewTicker(5 * time.Second)
            select {
            case <-ticker.C:
                rc.Flush()
            case <-rc.close:
                return
            }
        }
    }()

    return rc
}
The constructor for the requestBatcher will initialize all the variables and kick off a goroutine that calls Flush every five seconds. For a real production proxy, five seconds is likely far too long. It will give us enough time to see that our batching logic is working, however.
func (rc *requestBatcher) Append(key string, request *request) {
    rc.mu.Lock()
    defer rc.mu.Unlock()

    rc.batch[key] = append(rc.batch[key], request)
}
Append appends the given request to the slice of requests under the given key.
func (rc *requestBatcher) Flush() {
    rc.mu.Lock()
    defer rc.mu.Unlock()

    for key, batch := range rc.batch {
        fmt.Printf("%d batched requests under key %q\n",
            len(batch), key)

        // handle one candidate request
        candidateRequest := batch[0]

        w := httptest.NewRecorder()
        rc.handler.ServeHTTP(w, candidateRequest.r)
        responseBody := w.Body.Bytes()

        // write the same result to all requests in this batch
        for _, request := range batch {
            request.r.Body.Close()
            request.w.WriteHeader(w.Result().StatusCode)
            request.w.Write(responseBody)

            // let the goroutine for this request know that
            // it has been handled
            request.done <- struct{}{}
        }

        // delete the batch
        delete(rc.batch, key)
    }
}
Flush handles one request from each batch of requests and writes the same result to all requests in the batch. Finally, it deletes the batch of requests so we can start fresh after each flush.
func main() {
    rc := newRequestBatcher(proxyRequest)
    proxy := newProxy(rc)
    server := newServer()

    defer func() {
        proxy.Close()  // stop accepting new requests at the proxy layer
        rc.Close()     // close and flush out any pending requests
        server.Close() // stop the server
    }()

    // run until interrupted
    stop := make(chan os.Signal)
    signal.Notify(stop, os.Interrupt)
    <-stop
}

func newProxy(rc *requestBatcher) *http.Server {
    proxy := &http.Server{
        Addr: ":8080",
        Handler: http.HandlerFunc(func(w http.ResponseWriter, r *http.Request) {
            fmt.Println("[proxy]", r.URL.String())

            ch := make(chan struct{})
            rc.Append(r.URL.String(), &request{
                w:    w,
                r:    r,
                done: ch,
            })

            <-ch
        }),
    }

    // start the proxy
    go func() {
        fmt.Println("[proxy] running on port", proxy.Addr)
        fmt.Println(proxy.ListenAndServe())
    }()

    return proxy
}

func newServer() *http.Server {
    server := &http.Server{
        Addr: ":8081",
        Handler: http.HandlerFunc(func(w http.ResponseWriter, r *http.Request) {
            fmt.Println("[server]", r.URL.String())
            w.Write([]byte(r.URL.String()))
        }),
    }

    // start the server
    go func() {
        fmt.Println("[server] running on port", server.Addr)
        fmt.Println(server.ListenAndServe())
    }()

    return server
}

func proxyRequest(w http.ResponseWriter, r *http.Request) {
    u := url.URL{
        Scheme: "http",
        Host:   "localhost:8081",
        Path:   r.URL.Path,
    }

    request, err := http.NewRequest(r.Method, u.String(), r.Body)
    if err != nil {
        fmt.Println(err)
        return
    }

    response, err := http.DefaultClient.Do(request)
    if err != nil {
        fmt.Println(err)
        return
    }

    bytes, err := ioutil.ReadAll(response.Body)
    if err != nil {
        fmt.Println(err)
        return
    }
    response.Body.Close()

    w.WriteHeader(response.StatusCode)
    w.Write(bytes)
}
Our main function does the work of creating a new requestBatcher, standing up our simple proxy and server, and waiting for an interrupt.
- The proxy runs on
localhost:8080and will handle requests by Appending them to the batch of requests and waiting on thedonechannel for completion. If we didn’t wait for this channel, the request’s goroutine would exit and leave the response unwritten. - The server runs on
localhost:8081. It’s pretty straightforward: it handles requests by writing the response to be the URL of the request, like an echo server. proxyRequestis the handler that we pass tonewRequestBatcher. It tells the batcher what it should do with requests when flushing them. In this case, we’re indicating that requests should be made to the server atlocalhost:8081.
The entirety of this code is available on GitHub.
If we make several requests to the proxy in the background, like so:
$ curl localhost:8080/test &
$ curl localhost:8080/test &
$ curl localhost:8080/test2 &
$ curl localhost:8080/test &
The application logs each request, finds two sets of batched requests, and makes a single request to the server for each batch:
[proxy] /test
[proxy] /test
[proxy] /test2
[proxy] /test
3 batched requests under key "/test"
[server] /test
1 batched requests under key "/test2"
[server] /test2
Reverse proxy cache
A reverse proxy cache, as the name implies, is the combination of a proxy and cache. Requests are made to a proxy in front of an origin server which performs best-effort caching. It always reserves the right to fall back on the origin for a definitive response, which is a convenient property that makes failure scenarios relatively straightforward.
A less straightforward problem is handling cache eviction. Let’s consider a few options:
Automatic expiration after a TTL
This option works well with in-memory caches that are intended to protect against spikes of requests. The data isn’t cached very long, so its usefulness can be limited, however.
Intercept modifications and handle evictions
If all modifications to the underlying data go through the proxy layer, the cached data can be evicted as needed.
Only cache immutable data
In cases where modifications cannot be intercepted or the cached data is a computed result, more advanced techniques must be used. One such technique is to only cache unchanging, immutable data that never becomes stale or needs eviction. While this may seem impractical, it’s usually not.
Let’s say that you want to cache the result of running a query against some data. If you run the query today, you get five rows of data back. If you run it tomorrow, you get seven because new data arrived. The query result is therefore mutable. How can we make it immutable? What we’ll do is store the data under a cache key computed like so:hash(resource identifier, hash(query string), timestamp)
- resource identifier: the ID that references the data, like a customerId or datasetId within a customer’s account
- query string: the string that identifies the query, perhaps provided as a query parameter in the request’s URL or a JSON representation in the request’s body
- timestamp: the last updated time of the data stored under the resource identifier
Assuming the table like the following, if we make a query for all data stored under A, we’ll cache the response ([1, 2, 3]) under the cache key hash(A, hash(query string), 1539322037479). Then subsequent requests will only be cache hits if the data has not changed.
| ID | LastUpdated | Data |
|---|---|---|
| A | 1539322037479 | [1, 2, 3] |
| B | 1538431688314 | [8, 2, 3, 1] |
| C | 1537899135166 | [1, 10, 1] |
| D | 1538116563215 | [10, 9, 8, 7] |
Using this technique works best when the consumer provides a LastUpdated value as part of their request. Preferably they retrieved this value once and use it across multiple queries (to populate a dashboard, for example). If LastUpdated is not passed in on the request, the proxy can quickly retrieve it in the consumer’s behalf and use it to check the cache. Usually it’s much easier to get the LastUpdated value than compute a (potentially complex) query, so the caching layer still provides a lot of value.
Indexes
Using an index to access your data quickly is a well-known strategy for optimizing data access performance; probably the most well known when it comes to databases. An index makes the trade-offs of increased storage overhead and slower writes (since you must both write the data and update the index) for the benefit of faster reads. … Just as to a traditional relational data store, you can also apply this concept to larger data sets.2
When most developers hear the word “indexes”, they immediately jump to database indexes. At least this is the case for me. While I find databases indexes to be an interesting topic (to the point that I wrote a blog post which describes how database indexes work at a low level), this chapter’s explanation helped broaden my thinking around indexes beyond databases.
Indexes are helpful in the data access layers above the database. Consider a system which is backed by multiple database clusters. Creating an index that maps keys to the database responsible for those keys would eliminate the need to query multiple databases.
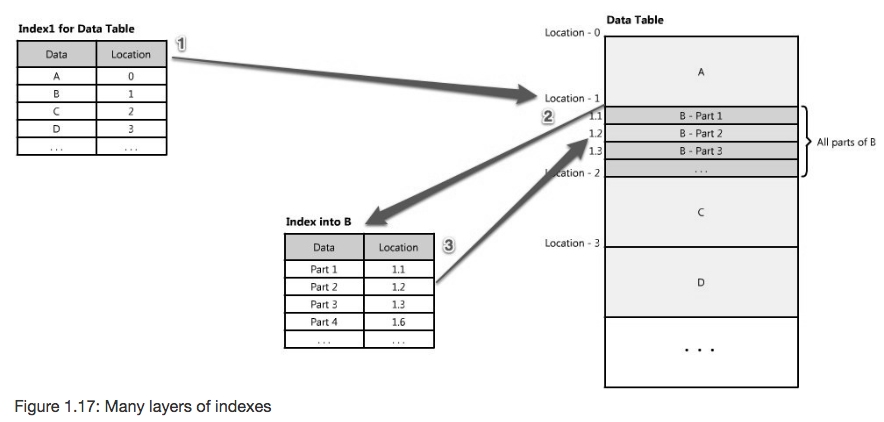
Multiple layers of indexes
Once the correct cluster has been identified, another index layer may identify the node within the cluster, and so on. This leads to the point that often creating multiple layers of indexes is worth the increased write latency. This figure from the chapter illustrates how multiple indexes can guide reads to the correct data:
Views
Indexes also allow the same underlying data to be organized differently without resorting to copying through the use of views:
Indexes can also be used to create several different views of the same data. For large data sets, this is a great way to define different filters and sorts without resorting to creating many additional copies of the data.
Load balancers
Load balancers are a principal part of any architecture, as their role is to distribute load across a set of nodes responsible for servicing requests. This allows multiple nodes to transparently service the same function in a system.2
Like caches, load balancers are placed in many strategic places throughout an architecture. They are also implemented in a variety of ways. There are several comparisons to be aware of in this space:
Software and hardware
Load balancers can be implemented either in software or hardware. A common commercial hardware offering is F5 while HAProxy is best known on the software side.
Layer 4 and Layer 7
Load balancers are generally grouped into two categories: Layer 4 and Layer 7. Layer 4 load balancers act upon data found in network and transport layer protocols (IP, TCP, FTP, UDP). Layer 7 load balancers distribute requests based upon data found in application layer protocols such as HTTP.6
North-south and east-west
North-south traffic is client to server traffic that originates outside of the datacenter (e.g. traffic routed through edge firewalls and routers). East-west traffic is server to server traffic that originates internal to a datacenter (e.g. traffic over a LAN connection between microservices in a Microservices Architecture).
Many businesses stand up a hardware load balancer at the edge of their datacenters and then use software load balancing for communication within each datacenter. These additional layers of software load balancing avoid the need to return back to the edge of the network to distribute load to a downstream service.
Client-side, server-side, and service mesh
Traditional load balancing strategies encourage either the client or the server to take responsibility for load balancing. The client might ensure that it properly sends traffic to a server in a distributed manner. A server, on the other hand, could protect itself with a reverse proxy layer that offers load balancing.
When both clients and servers are part of the same service mesh, they need not directly involve themselves in load balancing. Instead, calls from the client to the server can be transparently load balanced at the cost of some additional latency for a service mesh to distributed the load. Service meshes like Istio are gaining traction as they can provide load balancing, automatic retries, and other helpful features without direct participation from the involved services.
Queues
Unlike proxies and load balancers which augment an existing architecture and scale reads, queues have a more dramatic impact on the data flow of the architecture and scale writes. Queues have this impact by forcing the introduction of asynchronous processing.
While a synchronous system tightly couples a request to its immediate response, an asynchronous system separates the two. This is achieved by having clients provide a work request to the queue which is not immediately processed while the clients waits. “While the client is waiting for an asynchronous request to be completed it is free to perform other work, even making asynchronous requests of other services.”
In a synchronous system where clients are actively waiting for responses, service outages and intermittent failures are exposed directly to clients. High availability is difficult to provide, especially when the underlying database(s) are under high load and requests time out. Due to the asynchronous nature of queues, they can provide protection from failed requests. This takes away the stress of ensuring that every single request succeeds at the cost of great engineering effort. Retry logic is also much easier to implement in asynchronous processing, avoiding the need for “complicated and often inconsistent client-side error handling.”
This added protection from a lack of availability in a downstream service and improved retry logic makes a strong argument for the introduction of more queues into an architecture. The client of a queue can often be unaware that a downstream service was temporarily unavailable.
- http://www.aosabook.org/en/index.html [return]
- http://www.aosabook.org/en/distsys.html [return]
- http://www.aosabook.org/en/distsys.html#fig.distsys.9 [return]
- http://www.aosabook.org/en/distsys.html#fig.distsys.10 [return]
- http://www.aosabook.org/en/distsys.html#fig.distsys.17 [return]
- https://www.f5.com/services/resources/glossary/load-balancer [return]
Metadata and Navigation
Subscribe
Subscribe via my newsletter or RSS feed